Unit Testing Tutorial: Getting Started With Test-Driven Development (With Java)
The web offers a virtually infinite menu of information, which makes finding a unit testing tutorial fit for beginners a daunting task.
Well, if a unit testing tutorial is what you need, search no more. This is exactly what this post is about: a beginner-level unit testing and test-driven development tutorial, aimed at Java developers. Let’s dig in.
Unit Testing and TDD Fundamentals
Before we move on to the tutorial itself, it’s important that we’re on the same page when it comes to definitions. That’s what this section is all about. Let’s start with the obvious question: What is unit testing in the first place?
What Is Unit Testing?
A unit test consists of a program that exercises a small piece of the codebase in complete isolation. Most unit test cases contain assertions, which you can think of as verifications that a given piece of code works as you expect it to work under a given scenario.
By “complete isolation” we mean that unit tests don’t interact with elements that are external to the code, such as databases, the filesystem, or the network. Tests that adhere to this rule acquire some properties. For starters, they’re fast, since they don’t require reading or writing to the disk. But more importantly, they’re deterministic: If a given test is failing, you can run it any number of times and it will continue failing unless you change either the test or the production code being tested. The opposite is also true: A passing test will continue passing until a change to the code makes it otherwise.
What Is the Use of Unit Testing?
An old programming teacher of mine used to say, “The computer does what you tell it to do; not what you think you’ve told it to do.” In other words, the mismatch between what our code really does and what we think it does is what causes bugs. Unit tests are mechanisms that developers can use to eliminate—or at least reduce—that mismatch.
As the number of unit tests in a codebase grows, you reach a point when they become a reliable safety net for developers, who can then change the code without the fear of breaking it. They know that if they introduce a defect, the tests will catch it.
Are “Unit Testing” and “TDD” Synonymous?
Unit testing and TDD are related but different concepts. Unit testing refers to the type of software testing already discussed.
TDD, which stands for test-driven development, is a software development methodology. As the name suggests, TDD consists of using tests to drive the development of the application, leading to simple, iterative implementation with high test coverage from the beginning. When applying TDD, the development will follow a simple workflow:
- You start by writing a unit test related to the feature you want to implement. The test will obviously fail, since the production code doesn’t exist yet. In fact, in compiled languages such as Java, you won’t even get to run the test, since the code won’t compile.
- The second step is to make the test pass by writing the least possible amount of code. You don’t necessarily want to implement the correct solution, but just make the test pass. “Cheating” is OK in this step. For instance, you can just hardcode the expected value for a function’s return.
- The next step is optional. It consists of refactoring in order to get rid of duplication or other problems introduced in the last step. Here, your responsibility is to change the code and keep the test passing.
Getting Started With Unit Testing and Test-Driven Development in Java
With the fundamentals out of the way, it’s now time to get our hands dirty and learn how to do unit testing in Java.
Getting the Requirements Ready
The first step is to get our requirements ready. Since we’re using Java, it’s needless to say that you’ll need to have Java installed. I’m on Windows, and I’ll be using the free IntelliJ IDEA Community Edition as my IDE.
With those two requirements out of the way, we’re ready to start coding.
Let’s Create a Project
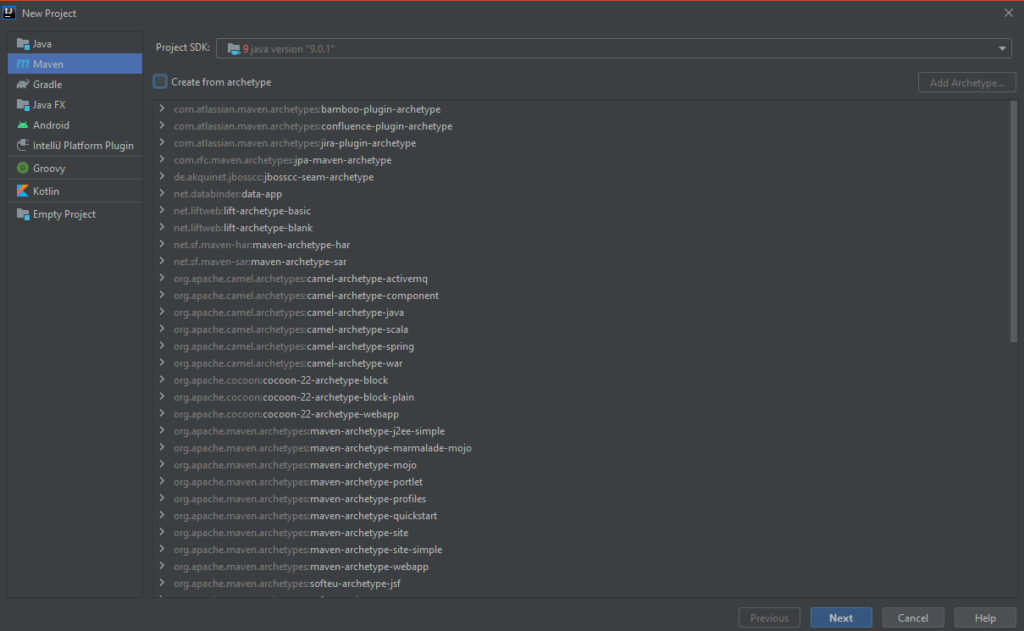
So, let’s start by creating a new project using IntelliJ IDEA. Start by firing up the IDE and clicking on New Project.

We’ll create a new Maven project. On the left panel, click on Maven. Then, click on the Next button:
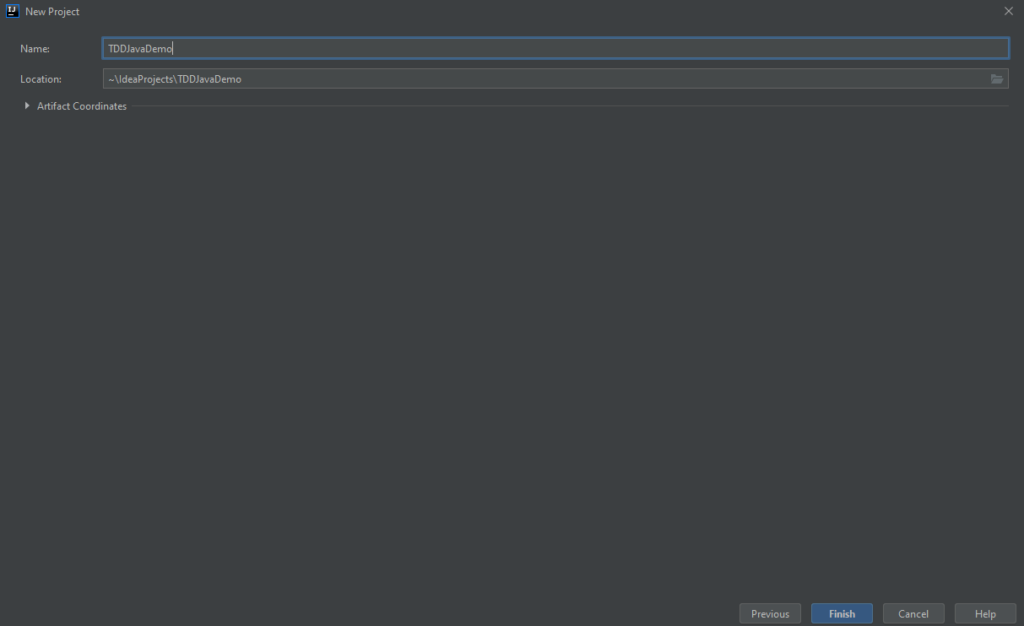
For the next step, choose a location and name for the project. Then, click on Finish:
Installing JUnit
Before we can start writing our tests, we need a testing framework, which is the tool responsible for running and checking the test’s results, besides providing the API we need to actually write the tests.
Since this is a Maven project, you’ll install JUnit by adding a new dependency to your pom.xml file. It should already be open in IntelliJ IDEA after the project was created. Copy and paste the following code on your file, then save it:

After that, click on the Load Maven Changes icon on the right upper corner of the screen:

Creating Your First Test Class
For this tutorial, we’ll use the famous String Calculator Kata, a problem proposed by Roy Osherov.
The problem Osherov proposes is simple: to implement a StringCalculator class, which should have a single method with the signature int Add(String numbers). The method should take a string containing numbers separated by commas and then return their sum. Providing an empty string should result in zero. There are further requirements and constraints, but for the sake of brevity, let’s disregard them.
So, let’s start coding. Since this is test-driven development, your first step should be to create a test class. Inside IntelliJ IDEA, locate the Project view and expand the src folder:
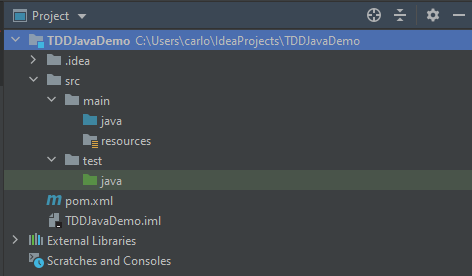
Do you see the test folder? That’s where your tests will live, inside the java folder. Right-click the java folder and then go to New, Java Class:
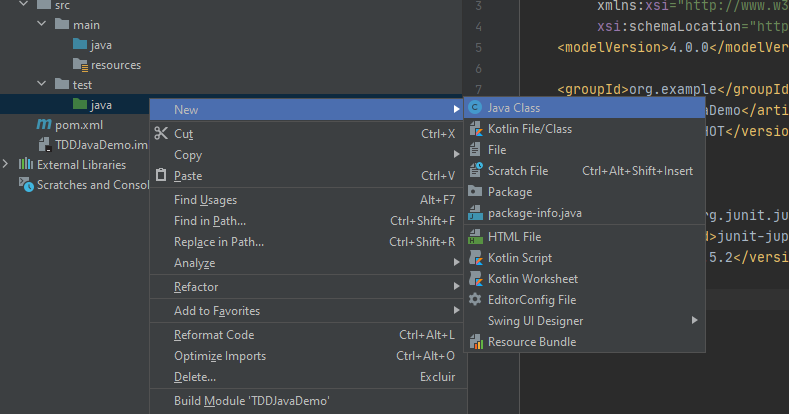
Name the class StringCalculatorTest and confirm. The class will be created and open for you. Add the following statements to the top of the class:

That will import the necessary packages so you can write your tests.
Starting With the Kata: Your First Failing Test
Now you have a working unit testing setup. You’re ready to start tackling the string calculator problem, TDD style. Copy the following method and paste it to your test class:

Here we’re asserting that passing an empty string to the add method from the StringCalculator class will result in zero. However, neither the method nor the class exists, so this code won’t even compile!
Making the Test Pass: Create the Production Class
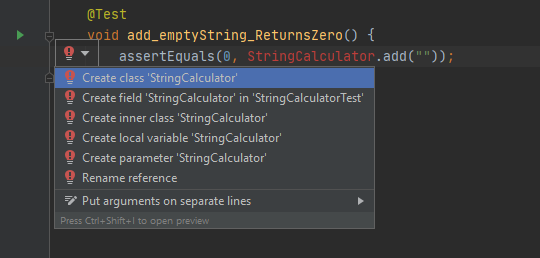
In IntelliJ IDEA, click on the StringCalculator class name inside the code for the test. Move your cursor to the left, and a red lightbulb will appear. Click the down arrow by its side and choose Create class ‘StringCalculator’ out of the options that appear.
Leave the options as in the following image and then click OK:
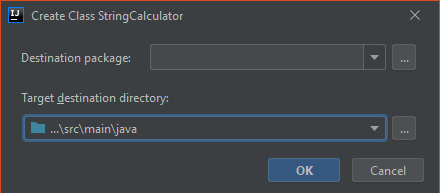
Making the Test Pass: Create the “Add” Method
The next step is just creating the add method with the expected method signature. Since returning zero would make the test pass, let’s pick a random number as the return value for now so that the test still fails:

Running the test now still results in failure, but this time it is a “good” type of failure, since the test will fail due to an assertion returning false, not due to a compiling error.

Making the Test Pass: Hardcode the Expected Value
To make the test pass, you just have to change the return value of add to zero. Just do it and run the test, which will pass:
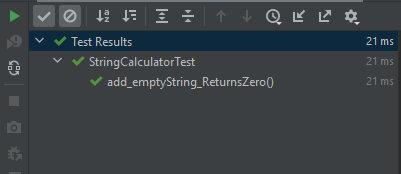
Success! You’ve successfully completed the first step of your first test-driven development implementation.
The Rest Is Up to You
You now have a working unit testing setup, complete with a testing class and a production class. As an exercise, we invite you to continue practicing the kata. A good next test would be verifying that a string with a single number should result in that single number being returned. As you walk through the test cases, you’ll see that the tests will drive you to write the correct implementation step-by-step.
For brevity’s sake, that’s all we’ll cover in this post. But if you’re anything like me, you’re probably burning with questions. For instance, if the implementation feels trivial, can’t I skip some of the TDD steps? How do I implement features that I can’t easily test?
Unfortunately, there’s only so much we can cover within a single blog post. A great next step would be to look for more in-depth resources, such as Cprime’s Test-Driven-Development with Java workshop. This is a three-day course totaling 24 hours of instruction that will teach you more about the fundamentals of unit testing and TDD, the skills you’ll need to use them effectively, and the benefits you can gain by adopting them.
Thanks for reading, and until next time.


