How to Integrate Jenkins with GitHub
Jenkins has become one of the most popular tools to create CI/CD pipelines. There are many reasons for this, and one is the number of plugins and integrations that allow users to work with almost any tool or platform out there. When you use a plugin, you only have to set some parameters like credentials. For instance, you could use a plugin to deploy your infrastructure to AWS or Azure. Or, you could use the GitHub plugin to use Git as a repository for application or infrastructure code—you’ve come here for this, I know.
Git is an essential plugin that everyone working with Jenkins will need. You can get to the point of configuring a Jenkins job only once. Then, all subsequent changes for the delivery pipeline can be done using a version control system like Git. Are you wondering how to do this? You’ve come to the correct place; I’ll show you how to integrate Jenkins with GitHub step by step.
Let’s get started!
Prerequisites
A necessary prerequisite is to have a server with Jenkins up and running with the GitHub plugin. It’s there if you installed the suggested plugins, but if you want to start from scratch, installing Jenkins isn’t complicated. You need to have Java 8 or 11 before you start. You’ll find more details in Jenkins docs about what it takes to install Jenkins in different platforms, like Linux or Windows. AWS or Azure marketplace have an option to instantiate a VM with Jenkins preinstalled. So, you have several options. Make sure you can log in with admin credentials to Jenkins and move on to the next section.
Create a Jenkins Job
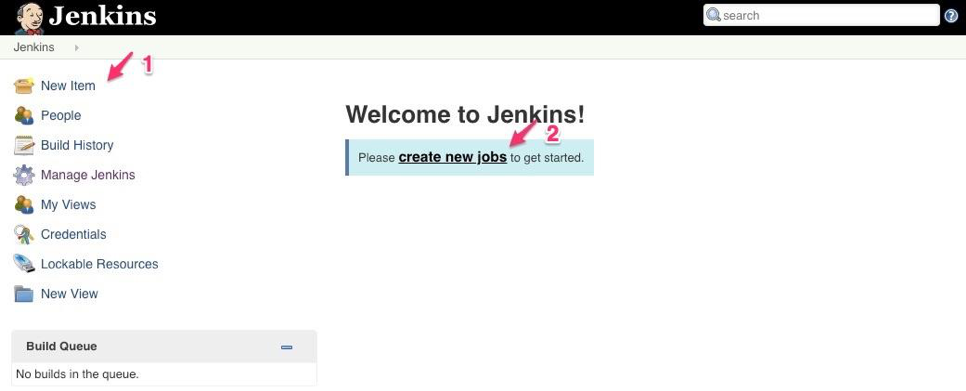
You now need to create a Jenkins job. To do so, click New Item (1). Or, if it’s a clean install, click on create new jobs (2). Below is a screenshot of what it should look like:
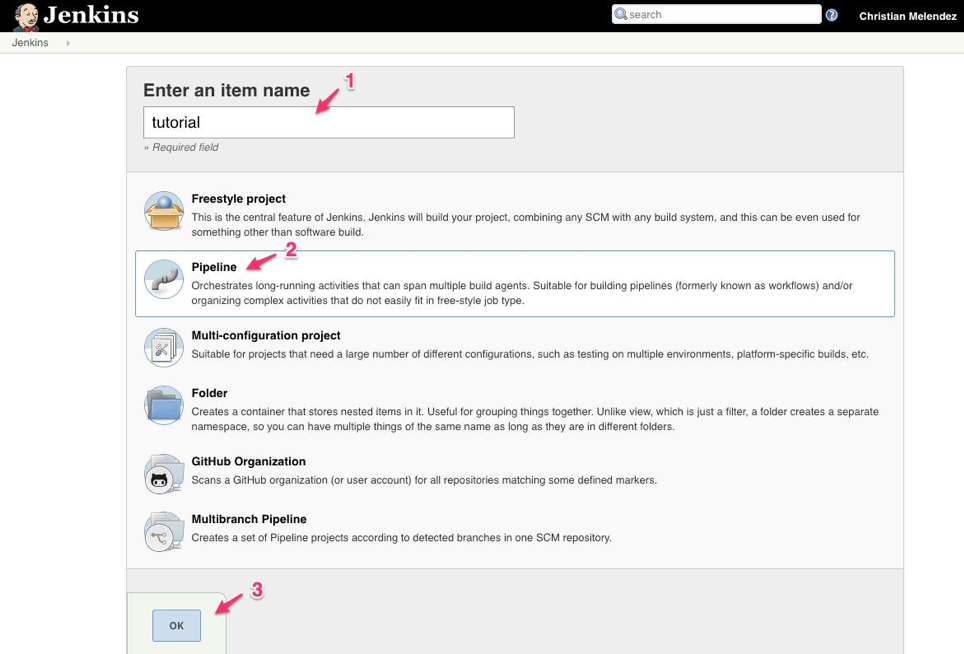
On the following screen, type a name for the job—for example, tutorial (1). Then, pick Pipeline (2) because we’ll create a job where the instructions are defined in a Jenkinsfile hosted in a GitHub repository. The reason I picked this type of Jenkins job is because I want to configure it as minimally as possible. All the exciting work is going to be defined as code in the Jenkinsfile. To finish, click OK (3).
Configure the GitHub Hook Trigger
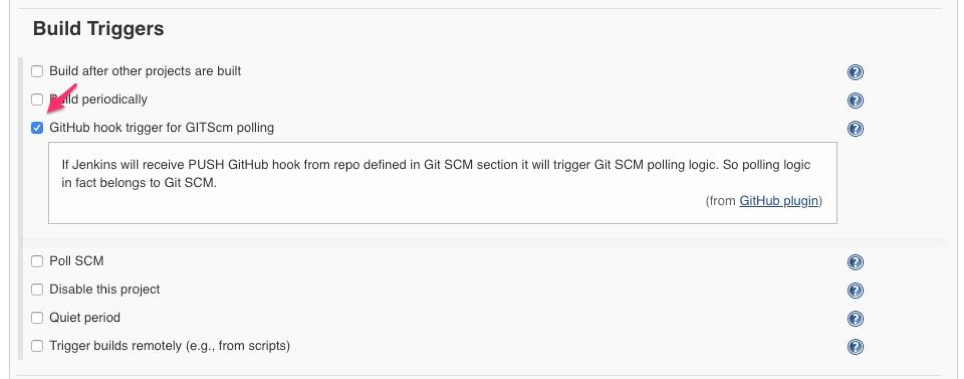
In the screen you see now, scroll down a little to the Build Triggers section. We’re going to make sure that this Jenkins job runs only when someone pushes a change in the GitHub repo. You can configure other actions, like when someone creates a pull request. But for simplicity’s sake, we’ll stick with the push action only. Of course, you can always run the job manually, but that’s not ideal. So, choose the GitHub hook trigger for GITScm polling option.
Use a GitHub Repository
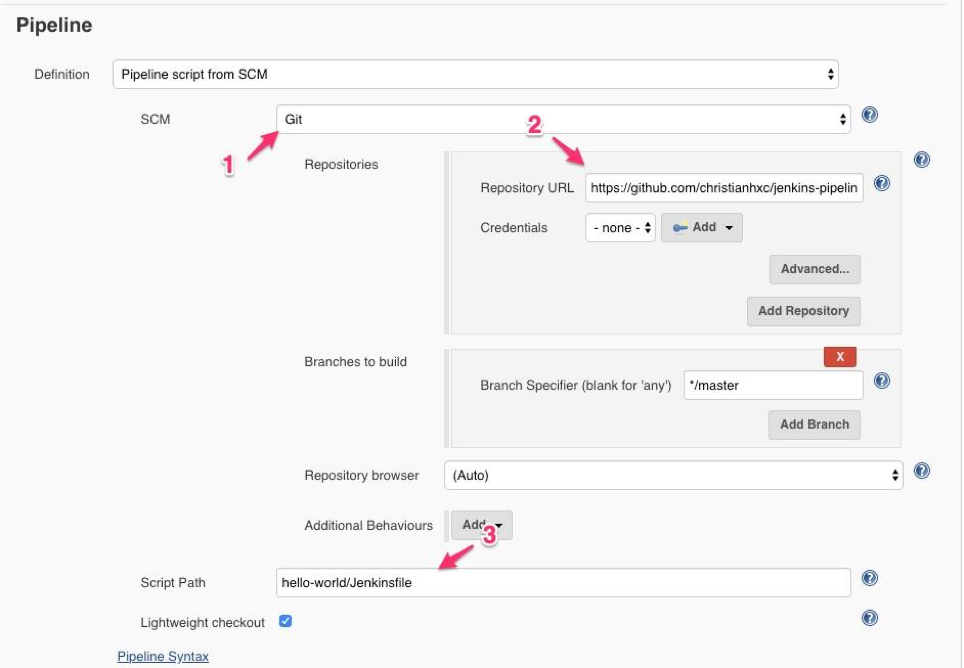
Scroll down a bit more and you’ll see the Pipeline section, where we’ll tell Jenkins to use the GitHub repo as the source. In the Definition dropdown, choose Pipeline script from SCM to configure the repo. For the SCM dropdown, pick Git (1), and below, in the Repository URL, type (or paste) the full GitHub repo URL. In my case, the URL of my repo is https://github.com/christianhxc/jenkins-pipeline-tutorial.git (2)—you’ll have to use your own. You’ll do a change later in the repo to test that the integration with GitHub works. Now, type the Script Path, which is going to be the path of the Jenkinsfile. In my case, the path is hello-world/Jenkinsfile (3). You can make a fork of my repo if you want to follow the same steps in this tutorial.
Finally, click on the Save button that appears at the bottom of the screen.
Add a Webhook in GitHub
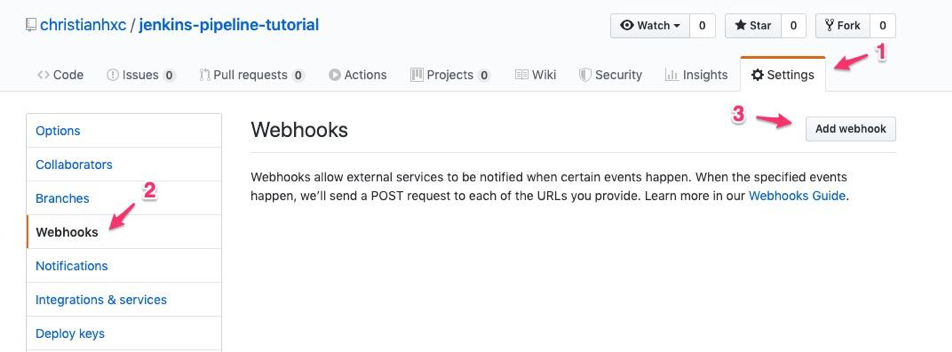
Now, go to the GitHub project because it’s time to configure the webhook so that GitHub can trigger the Jenkins job after every push in the repo. In your project, click on the Settings (1) tab, then click Webhooks (2) from the left panel. Now, click on the Add webhook (3) button at the right. Here’s a screenshot for reference:
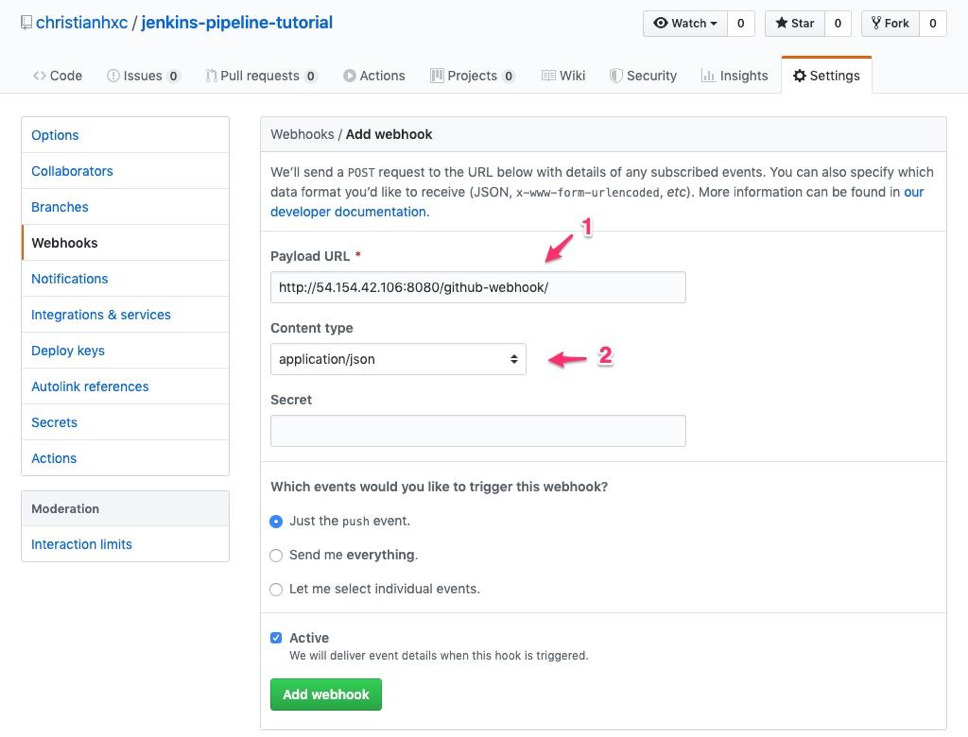
You’ll see a new form. Make sure you have the correct values, because this is the information GitHub will use to call your Jenkins server. The Jenkins endpoint you’ll use must be publicly available over the internet. In my case, the Jenkins URL is http://54.154.42.106:8080/, and I need to add github-webhook/ at the end. So, the Payload URL in my case is http://54.154.42.106:8080/github-webhook/ (1). Next, for the Content type dropdown, pick application/json (2). Leave the rest of the options as they are, with the Just the push event option selected. For simplicity, I said before that GitHub would call Jenkins only when there’s a push in the repo. If you want to configure other actions, you’ll have to select Let me select individual events, but for now, let’s keep it simple. Finally, click on the green Add webhook button.
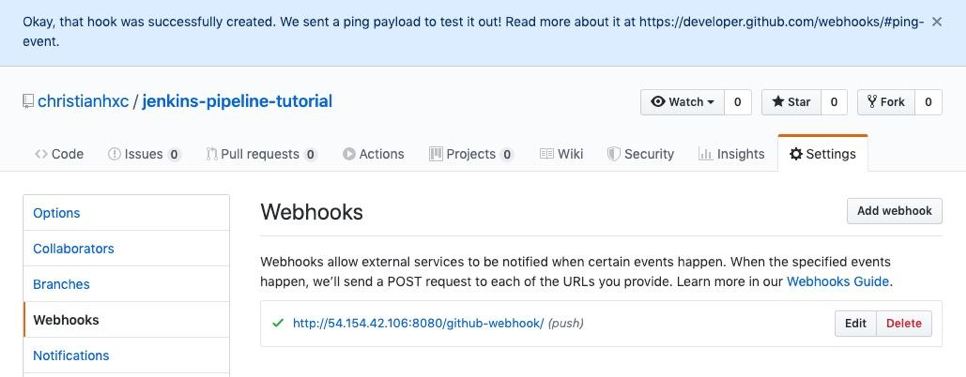
If the webhook works, you’ll see a notification at the top saying that the hook was successfully created, as in the screenshot below:
Build the Jenkins Job Manually
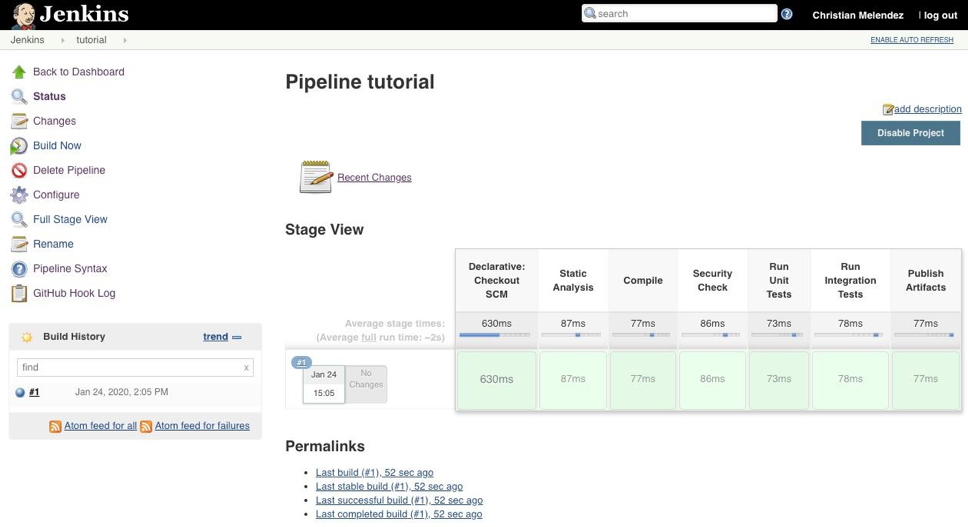
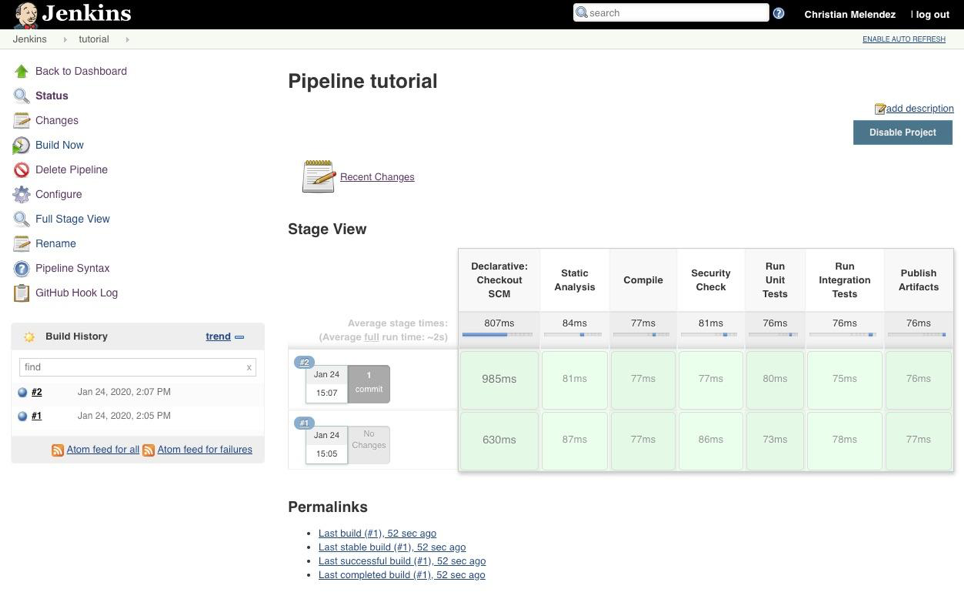
Now go back to Jenkins, because we need to warm up the integration. To do so, click on the Build Now link from the left panel, and the Jenkins job will start running. This is a way of saying to Jenkins, “Hey, this job has the GitHub trigger option configured.” So, even if this step doesn’t make sense, do it, because I spent a few minutes figuring out why the integration with GitHub wasn’t working.
You should see a successful run of the job, like this:
Change Something in the GitHub Repo
You finished the integration with GitHub in the previous step. But because you and I are good citizens, let’s make sure that this integration works fully. So, go to the GitHub repository and change something, commit, and push. In my case, I added a new stage in the Jenkins pipeline to include more tests. Wait for a few seconds, and you should see another successful run of the job.
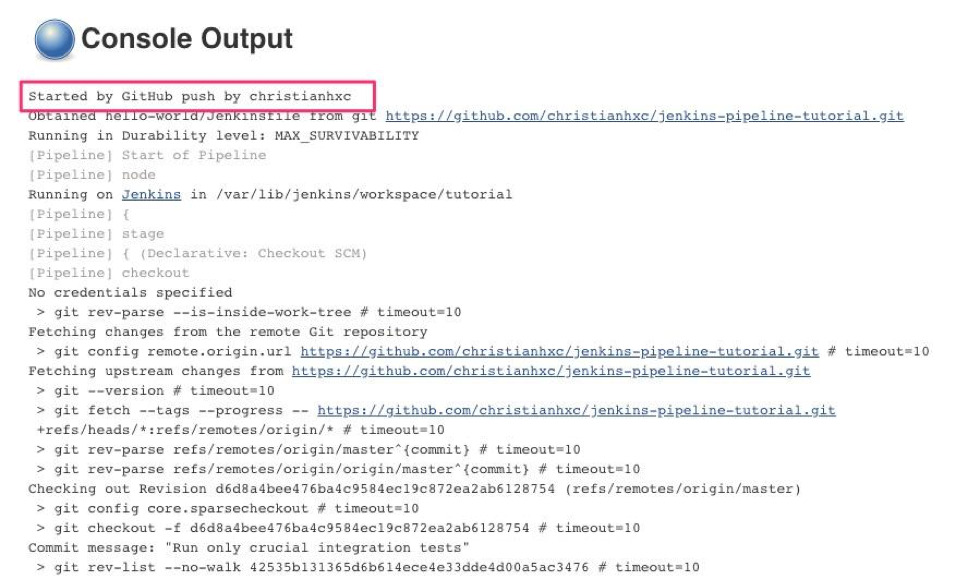
If you go the logs for the second time the job ran, you’ll notice something different at the beginning of the logs saying that GitHub started it, along with the username:
And that’s it—that’s how you integrate Jenkins with GitHub. Every time someone pushes a change in the repo, this Jenkins job will run.
GitHub Integrates Pretty Well With Jenkins
When you configure your CI/CD pipelines in the way we did in this tutorial, the team is more productive. There will be a time where the team will forget about Jenkins. Every new step, update, or cleanup will be done in the Jenkinsfile. We configured the job where the flow will be like this: Developers change code, GitHub triggers the Jenkins job, and Jenkins executes all the steps needed to deploy the new change.
If you want to learn more about Jenkins pipeline, you can take a look at the official docs. Everything you need to know is there—the syntax, how to use it, how it works, and so on. Have fun, and always try to keep things clean and simple.
